2017年11月4日 星期六

Visual Studio2017擴充功能Visual Studio Bitbucket Extension

最近在工作上,需要使用到Bitbucket提供的Git版本控制服務,雖然Visual Studio2017有支援Git,但如果要能完整地在Visual Studio2017上使用Bitbucket還是不太容易。

所以這時,就讓我找到了Visual Studio的擴充功能「Visual Studio Bitbucket Extension」啦!
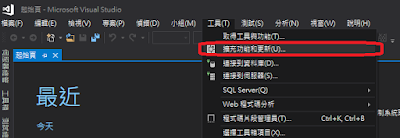
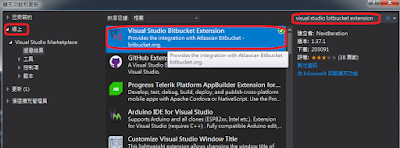
安裝新的擴充功能
安裝新的擴充功能
搜尋Visual Studio Bitbucket Extension
然後只需要重新啟動Visual Studio,讓系統自動安裝擴充功能,這功能使用上跟GitHub Extension for Visual Studio一樣,裝好後只需要享受美好的GUI介面就行了!

2016年7月3日 星期日

C語言標準函式庫下的排序函數qsort

用C寫程式時,有很多機會可以用到排序法,但全部自己實作,感覺起來真的太累了!...QAQ

在找尋偷懶方法前人智慧時,找到了在標準函數庫(stdlib.h)下的qsort函數,沒想到標準函數庫早已準備好現成的偷懶方法函數了!

qsort有什麼特點呢?

優點:
  1. 由於是標準,所以跨平台沒問題~
  2. 偽泛型,只要提供比較用的函數,可排序各種型別的陣列。
  3. 現成的排序法,懶人好物www
缺點:
  1. 只能對陣列使用,鏈結串列什麼的,通通不認識!
  2. 要知道函數指標,提供規定的比較函數,但這應該不是大問題XD
  3. 請瞭解指標~

函數解析

void qsort(
    void *base,
    size_t n,
    size_t size,
    int ((compare) (const void *const void *)
)
  1. base:陣列的起始位址。
  2. n陣列元素數量。
  3. size:陣列的型別大小,sizeof是您的好朋友
  4. compare:比較函數的指針,回傳整數,輸入不能兩個更改目標資料的指針。
注:void類型的指針,可以指向任何類型,所以可以達成類似泛型的功能。

實彈操演

題目:有5位學生,須以總分排序、國文、英文、數學作順序排列。

#include <stdio.h>
#include <stdlib.h>

#define ARRAY_MAX 5

typedef struct _Classmate
{
           int chinese, english, math;
}Classmate;

/*
傳回-1代表 a < b
傳回 0代表 a = b
傳回 1代表 a > b
*/
int compare(const Classmate *a, const Classmate *b)
{
           /* 總分比較 */
           if (a->chinese + a->english + a->math !=
                     b->chinese + b->english + b->math)
                     return (a->chinese + a->english + a->math <
                                b->chinese + b->english + b->math) ? -1 : 1;

           /* 先比國文 */
           if (a->chinese != b->chinese)
                     return (a->chinese < b->chinese) ? -1 : 1;

           /* 在比英文 */
           if (a->english != b->english)
                     return (a->english < b->english) ? -1 : 1;

           /* 最後數學 */
           if (a->math != b->math)
                     return (a->math < b->math) ? -1 : 1;

           /* 全部相等 */
           return 0;
}

void printAll(Classmate *classmate)
{
           int i;
           for (i = 0; i < ARRAY_MAX; i++)
           {
                     printf("[%02d] %3d + %3d + %3d = %3d\n",
                                i + 1,
                                classmate[i].chinese,
                                classmate[i].english,
                                classmate[i].math,
                                classmate[i].chinese + classmate[i].english + classmate[i].math
                     );
           }
}

int main(int argc, char *argv[])
{
           Classmate classmate[ARRAY_MAX] = {
                     {  50,  75, 90 },
                     {  30,  46, 50 },
                     { 100,  80, 60 },
                     {  55,  55, 80 },
                     {  95, 100, 70 }
           };

           printf("====== 排序前 ======\n");
           printAll(classmate);

           qsort(
                     classmate,
                     ARRAY_MAX,
                     sizeof(Classmate),
                     compare
           );

           printf("\n====== 排序後 ======\n");
           printAll(classmate);

           return 0;
}

輸出

====== 排序前 ======
[01]  50 +  75 +  90 = 215
[02]  30 +  46 +  50 = 126
[03] 100 +  80 +  60 = 240
[04]  55 +  55 +  80 = 190
[05]  95 + 100 +  70 = 265

====== 排序後 ======
[01]  30 +  46 +  50 = 126
[02]  55 +  55 +  80 = 190
[03]  50 +  75 +  90 = 215
[04] 100 +  80 +  60 = 240
[05]  95 + 100 +  70 = 265

參考資料

2016年6月18日 星期六

visual C# 2015中EmguCV的簡單安裝法

最近剛好需要幫openCV的程式做UI,經過一段時間痛苦掙扎仔細思考後,決定使用Visual Studio 2015作為開發環境,以C#及EmguCV來達成目標。

再爬完各種教學、安裝文後,意外發現竟然可以使用NuGet安裝!!

這下可方便了眾生阿~    (茶~)

重要聲明:

  1. 注意,由於NuGet套件安裝,是針對專案安裝,與以往直接安裝到電腦不同,每次重新創建專案時,都需要重復下列動作。
  2. 如果工具箱有失效的元件,請在工具箱中按下右鍵,選擇"重設工具箱",即可恢復到初始狀態。


使用NuGet安裝的方法如下:
  1. 在專案項目按下右鍵,選擇"管理NuGet套件"。
  2. 在NuGet選擇瀏覽頁面中,搜尋EmguCV,作者為emgu,此處使用最新穩定版3.1.0.1安裝。
  3. 這裡跳出即將安裝的套件,如果沒問題,那就按下確定吧!
  4. 如果要加入EmguCV的UI,請在工具箱中按右鍵,選擇"選擇項目"。
  5. 在.NET Framework元件頁面中按"瀏覽"按鈕。
  6. 選擇專案資料夾下的\packages\EmguCV.3.1.0.1\lib\net30\Emgu.CV.UI.dll。
  7. 確認EmguCV的元件皆有選取後,按下確定。
  8. 如果安裝正常,工具箱中會出現EmguCV的元件。
看到這裡,恭喜你~~
你已經安裝完成啦~
好好享受你的程式之旅吧!


2016年6月5日 星期日

Visual Studio 2015與.inl檔案

今天在寫樣本(template)時,使用了Visual Studio 2015的類別精靈產生標頭檔(.h)跟實作檔(.cpp),為了維持標頭與實作分離,我改了副檔名成標頭檔(.hpp)跟實作檔(.inl),沒想到編譯時,竟然會產生重復定義,而且完全不知道原因...

爬文好久之後,發現stackoverflow上的這篇Why is this simple template class breaking in VS 2013 and not VS 2010

根據此文的說法,我重新新增.inl時,此問題就解決了!!

為了瞭解原因,我檢查了這兩種方式的生成的檔案。

.cpp與.inl最大的差異在項目類型.cpp是"C/C++編譯器",而.inl卻是"不參與建置",這時我才知道重復定義的錯誤是如何產生的.....

因為改檔名對Visual Studio內部檔案的屬性設定,並不會產生影響,所以單純改檔名時,造成項目類型錯誤,導致.inl參與建置,而令編譯器產生重復定義的錯誤。

以此文謹記此錯誤